Hidden AirTag Rear Reflector: Discreet Bike Tracking

Reflective Tail Light-Style AirTag Mount: Bike Visibility with Discreet Tracking
A rear reflector that also hides an AirTag can add a practical layer of security without changing the look of a bike. Instead of an exposed tracker puck or an obvious bracket, this style of mount blends in as a normal rear safety accessory while giving the AirTag a protected home. Below is a clear breakdown of how it works, who benefits most, what to check before buying, and how to set it up for everyday riding and theft recovery.
What This Reflector Mount Does
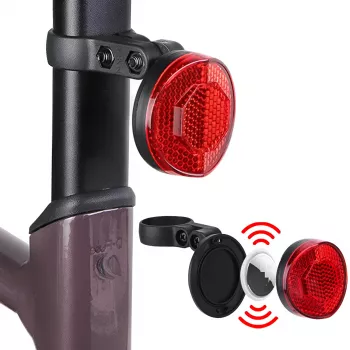
A reflective tail light-style AirTag mount combines two useful ideas: basic rear visibility and low-profile tracking. The outer shape resembles a typical rear reflector housing, while the inside includes a small compartment intended for an Apple AirTag.
- Combines a rear-facing reflector profile with a hidden compartment intended for an Apple AirTag.
- Helps keep tracking discreet by placing the AirTag in a location that looks like a standard bike safety accessory.
- Adds rear visibility support for low-light conditions when illuminated by headlights.
- Aims to reduce the chance of quick, obvious removal compared to exposed AirTag holders.
Who It’s Best For
- Commuters who lock up in public areas and want a low-profile tracking option.
- Students and city riders who park bikes in racks with frequent turnover.
- Casual riders who want an inexpensive add-on for both visibility and recovery support.
- Anyone who prefers a mount that blends in rather than a dedicated tracker bracket.
Key Features to Look For in a Hidden AirTag Rear Reflector
Discreet form factor
The best designs look like ordinary rear reflector or tail light housings. A “normal” appearance matters because it reduces the chance someone immediately suspects there’s a tracker inside.
Secure closure
Bike vibration is constant—especially on rough roads, curb cuts, and gravel. Look for a cover that closes firmly and stays shut so the AirTag doesn’t rattle or work loose.
Mounting compatibility
Some mounts fit the seatpost, others attach under the saddle rails, and a few use existing rear mounting points. Match the design to where your bike has space and hardware.
Weather considerations
An AirTag is not designed to live in a soaking-wet environment forever. A mount that helps shield the compartment from direct spray can improve long-term reliability, especially in rainy commutes.
Serviceability
AirTag batteries are replaceable, so make sure the compartment can be opened without frustration. Easy access encourages regular checks and battery swaps instead of “set it and forget it” until it dies.
Compatibility Checklist Before Buying
- Confirm an Apple AirTag is available; the mount is typically an accessory and may not include the tracker.
- Check bike frame layout near the rear (seatpost, saddle, or rear reflector mount points) to ensure there’s clearance.
- Make sure the chosen location won’t interfere with a rear light, fender, rack, or saddle bag.
- If using another rear light, plan placement so the reflector mount doesn’t block the light beam or visibility angle.
Quick Fit Check
| Bike setup | Mount location to verify | What to watch for |
|---|---|---|
| Road bike (minimal accessories) | Seatpost / under-saddle area | Clearance with saddle rails and seatpost height markings |
| Commuter bike (rack or fender) | Rear of seatpost or under saddle | Avoid contact with rack top platform or fender stays |
| MTB (mud and vibration) | Under saddle / seatpost | Extra vibration; ensure closure stays tight and doesn’t rattle |
| E-bike (more cables/accessories) | Seatpost / rear frame zone | Do not pinch cables; keep away from suspension movement if present |
Installation and Setup (Practical Steps)
- Clean the mounting area so the mount sits flush and doesn’t slip.
- Test-fit the mount before inserting the AirTag to confirm alignment and closure.
- Insert the AirTag securely and verify the compartment fully closes.
- After mounting, shake the bike lightly and ride over a short bumpy stretch to confirm no movement or rattling.
- Open Find My to confirm the AirTag updates location as expected; allow time for nearby Apple devices to relay location.
Using It for Real-World Bike Security
A hidden AirTag mount is most effective when treated as a recovery aid—not the primary theft deterrent. Strong locks, smart parking choices, and good documentation still matter.
For a deeper look at safety basics that reduce crash risk in traffic, review guidance from NHTSA’s bicycle safety resources and the CPSC’s bicycle safety education. For privacy and safety features related to AirTag tracking alerts, see Apple Support’s overview of unwanted tracking alerts.
Care, Battery Access, and Weather Tips
Reflector Placement and Visibility Basics
Shop Related Essentials
- Reflective Tail Light for AirTag – Bike Safety Rear Reflector & Hidden Mount
- USB Type C to Lightning Fast Charging Cable for Apple iPhone 15/14/13/12
- Floral Luminous Silicone Case for Apple AirPods Pro
FAQ
Does this mount include an AirTag?
Most listings are for the mount only unless an AirTag is explicitly stated as included. If it isn’t clearly bundled, plan to purchase the AirTag separately.
Will the AirTag still update its location if it’s inside the reflector housing?
AirTags use Bluetooth and the Find My network, so signals typically pass through non-metal housings. Update frequency still depends on nearby Apple devices detecting the AirTag and relaying its location.
Is a rear reflector enough, or is a rear light still needed?
A reflector helps when it’s hit by headlights, but an active rear light is visible in more situations, including unlit paths and intersections. Using both together provides more consistent rear visibility.









Leave a comment